
Published Saturday October 23, 2021: Updated 12/5/2021
Our New Home
I have wanted to build a home from scratch ever since I was old enough to carry a hammer. When asked in elementary school what I wanted to be when I grew up, the answer was either a builder or an electrical engineer.
I kind of became both.

One of countless huts I built over the years (Left -John (me), Right -Wade and Rear -my very brave grandma standing on the roof of my hut.
I worked in construction in high school and college. Taking on major DIY remodeling projects is one of my favorite past times.
In 2018 my wife and I were looking at architectural designs on Pinterest. One thing led to another and we decided to design our new home. We went back and forth on the plans and layout until we agreed on a design that met our budget, my energy efficiency goals and her stylistic aspirations.
We bought an empty 1/4 acre lot on the East side of Layton, UT. The property sits on a hill, starting out flat at street level and rises up 33 feet at the very back. The neighborhood was created 30 years ago but no houses had yet built here. It was fortunate that we were looking when it was listed by a developer who was hanging on to it and finally decided to let it go.

Render of our Home using 1990's Era Software

After a lot of back and forth, the City finally approved the plans and gave me a building permit
Self Contracting led to Self Building The House:
The idea was to build much of the house myself and contract out the big stuff. Due to a crazy economy, I was unable to find and schedule most of the trades in my time frame or budget.
I ended up doing most of it myself, including excavation.
I rented a back-hoe (way smaller than I imagined it would be), spent a day learning how to operate it and 2 weeks excavating and 2 weeks loading up countless dump trailers, giving away the dirt.

Chop-Stick the Little Backhoe that Could

The garage before it was a garage
I also poured my own footings (which is one of my favorite parts of building a house) and playing with adult Legos by setting up ICF walls.

Garage Footings

The massive North wall footing and starting to stack ICFs

Stacking First Level of ICFs (Insulated Concrete Forms)

Second Level of ICFs going up amid a spring shower
I did all the framing, flooring and sheathing myself. Due to a scheduling conflict I ended up doing all the trusses myself too. That was insane.

Putting up Trusses one at a time, by hand

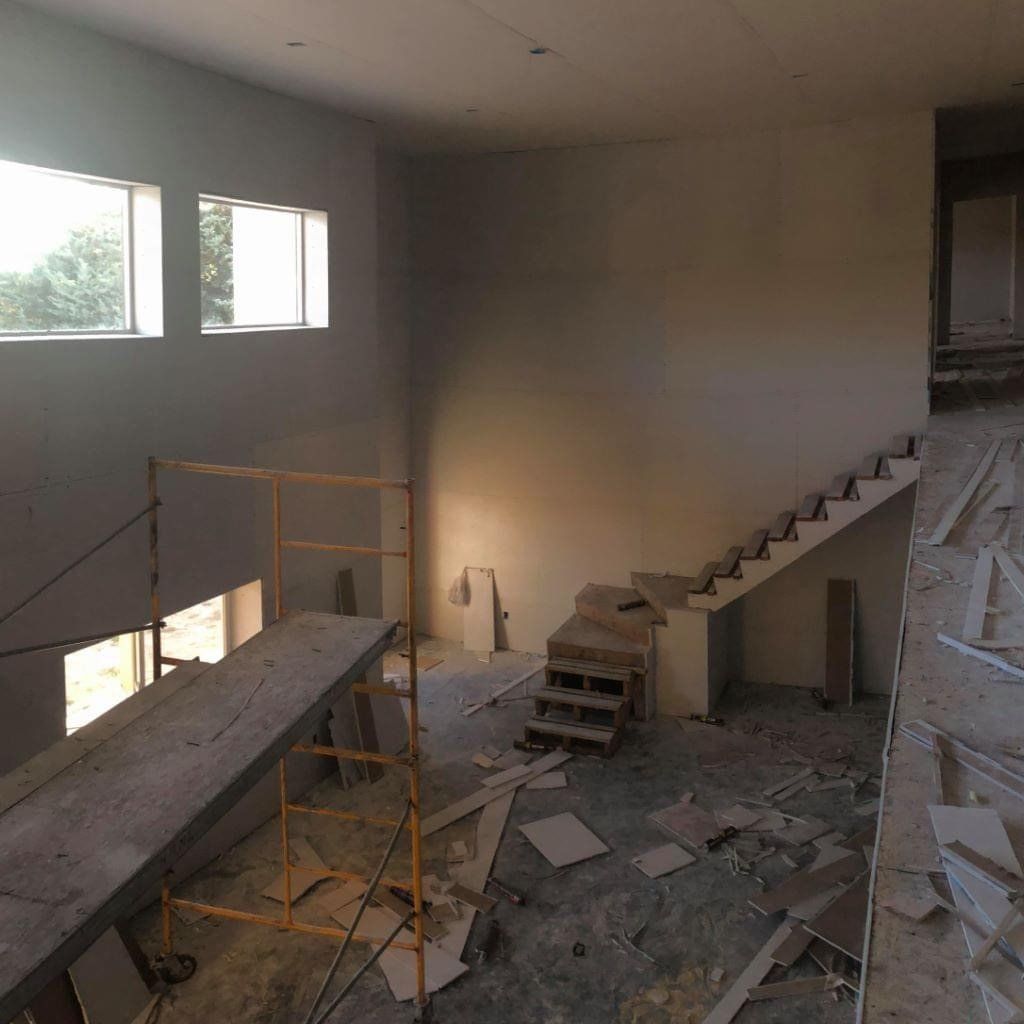
View of Living Room and Stair Case
I hired out the flat concrete work. Toller concrete did an amazing job. I hired them again for the driveway, backyard patio and concrete retaining walls.

Sheathing the Roof
I am well versed in electrical and plumbing so I gladly took those on myself, including all rough plumbing and main sewer lines.
I wanted to hire out the duct work but couldn't find anyone available to do it. So I read up on it and did it myself. I couldn't find anywhere that sold square ducts so I did it all in round ducts. They have more efficient airflow anyway.

Ducts ranging from 14" diameter down to 8" and then 6" to each register
I was told by the city and Rocky Mountain Power that there was a power box on the property to set up temporary power for building the house. After months and many attempts at trying to locate it I finally convinced them that there was no power box.
In the mean time, I used the Bolt for power to run my air compressor and charge up all my tools.

The Bolt can do 4-5 sheets of flooring per mile of range. How's that for fuel economy?
The Bolt also makes a great work truck. Over the 18 months it took me to build the house, it hauled more than its fair share of lumber, pipe, wire, tile, stone, concrete and duct work.

The Bolt makes a great work truck
I hired out the insulation. They did the whole job cheaper than what it would have cost me to buy the materials. So that was a no brainer.

Insulation in the attic and a long-range UHF TV antenna

R-60 Insulation in the attic and the cat-walk board running the length of the attic

Insulation in the great room

The Lab, freshly insulated
By the time RMP ran electricity to the property, the house was enclosed and we were ready for sheetrock. Instead of setting up a temporary meter stand, they added a meter to the main breaker box that I had already mounted on the exterior of the house.
By the way, I also hired out hanging and finishing the sheetrock. It was pretty expensive but they did a fantastic job. Way better than I could have done.

Amazing Sheetrock hanging skills by Messerly Sheetock and just ONE guy hung most of it
I installed all the windows and hung all the doors. Also the finishing work, (paint, kitchen, light fixtures, sinks, toilets, laminate flooring, shower surrounds, tile work, molding and door casings, etc.)

The wife and kids assembled all the IKEA Kitchen Cabinets. I hung them up and installed the doors.

Finishing the master bathroom

Installing hand railings and staining the stair treads (or maybe just building a giant xylophone).

Tile on the Deck that looks like wood planks
I hired a man named Jose whose crew who did all the stucco and stone façade but when I tried to hire him back to do the porch pillars, he disappeared off the face of the Earth.
Maybe he was just too busy with other jobs.
I ended up doing the pillars myself. It's a lot like wall tile and kind of fun to do. It's just very time consuming. There's about 300 lbs. of stone façade on each pillar.
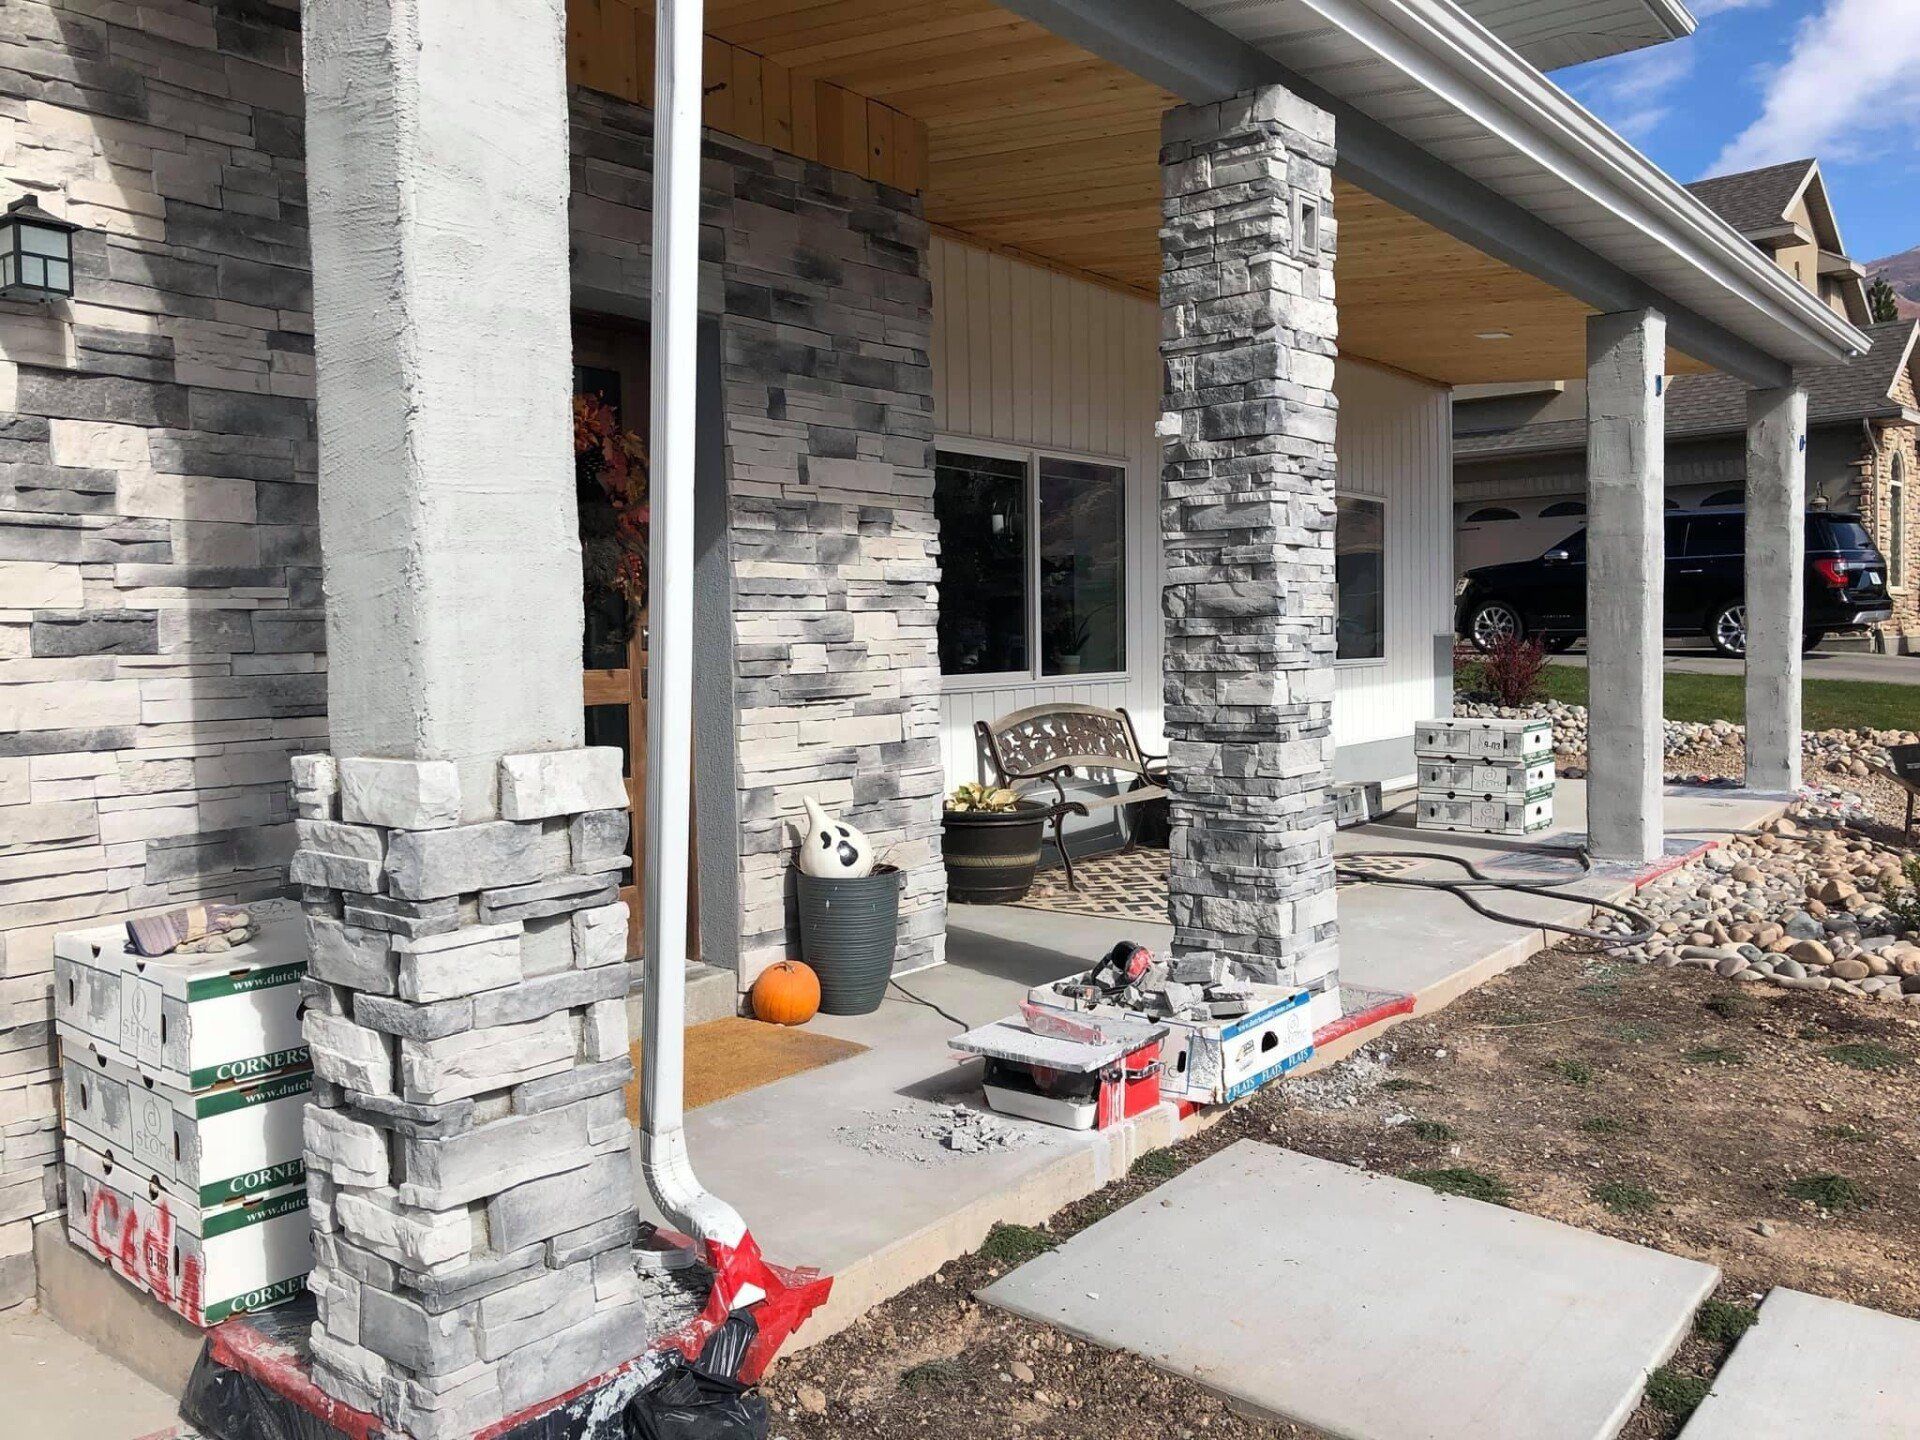
Finishing the stone façade myself after the stone guy I hired for the walls disappeared and wouldn't return my calls
I couldn't find anyone who would install the new heat pump that I bought online so I ended up having to do the refrigerant lines myself as well. It turned out well, after a bit of a learning curve.
Here are the basic efficiency features of our new home.
Size:
3400 square feet
Insulation:
Floors:
R-20 Under the Concrete slab in the house (Two 2" sheets of pink foam insulation).
R-10 Under the concrete slab in the garage (A single 2" sheet of pink foam insulation).
Vapor barrier between insulation and the concrete floor.
Concrete has #4 rebar in a 12" x 12" grid.
R-19 between floors in the house (for acoustic insulation)
Garage doors are completely insulated, even the structural members in the door are filled with foam.
Walls
R-40 ICFs (Insulated Concrete Forms): 2.5” of Styrofoam R-15 + Concrete + 2.5” of Styrofoam R-15 gives an effective R-40 of insulation in the walls. That’s according to the manufacturer Build Block. I can attest to the thermal mass of the wall. The house keeps its heat for hours and hours. There is a grid-work of #5 rebar spaced 12” vertically and every 16” horizontally. This was per requirements of building in a seismic zone D.
Stacking the ICFs went together as if they were Lego blocks. I highly recommend them to anyone looking to build their own house. They are also incredibly sound proof. This comes in handy as we are only a couple of miles from Hill Airforce Base and the Jets can be really loud. It never gets old hearing them buzz the house then tear a hole in the sky flying strait up. Outside it's deafening. Inside you can still hear them but you can still carry on a conversation.
R-26 in double framed 2x4 (8" total thickness), stud walls in exterior wall above garage
R-13 Interior 2x4 walls (for acoustic insulation)

Pouring First Level of ICFs (I'm the middle guy standing on the catwalk).
Ceiling Insulation:
R-38 above garage (floor of the rooms above garage)
R-60 in the Ceiling
Added an attic ladder and built an elevated catwalk along the length of the attic.
HVAC:
Goodman 36,000 BTU 16 SEER 2 Stage Air Source Heat Pump. With matching air handler (A 5kW heating element runs during defrost cycles).
Air source heat pumps used to only be effective in climates that have mild winters where temperatures generally didn’t get below freezing.
Heat-pumps have gotten much more capable and more energy efficient these last few years. Their lower operational temperature range is now well below freezing.
Our model operates well into the single digits °F temperatures and supposedly down to as low as to -10 °F outside. Last year it got down to 2°F. It's amazing that the heat pump can still collect heat in these frigid temperatures and warm the house so efficiently.
HRV (Heat Recovery Ventilation): Fantech Brand
The house is built so air tight that ventilation to the outside is needed. HRVs are great at keeping energy losses at a minimum).

HVAC, HRV and Heat-pump Air Handler

Inside view of the HRV
DWHR (Drain Water Heat Recovery):
I installed the 72" long 3" diameter DWHR unit in the house's single sewer stack. It recovers on the order of 70-75% of the heat in the water running down the sewer stack.
During the design phase, I spent a lot of effort to minimize plumbing runs by placing bathrooms, laundry and kitchen close together while still preserving the aesthetics and style of the home.
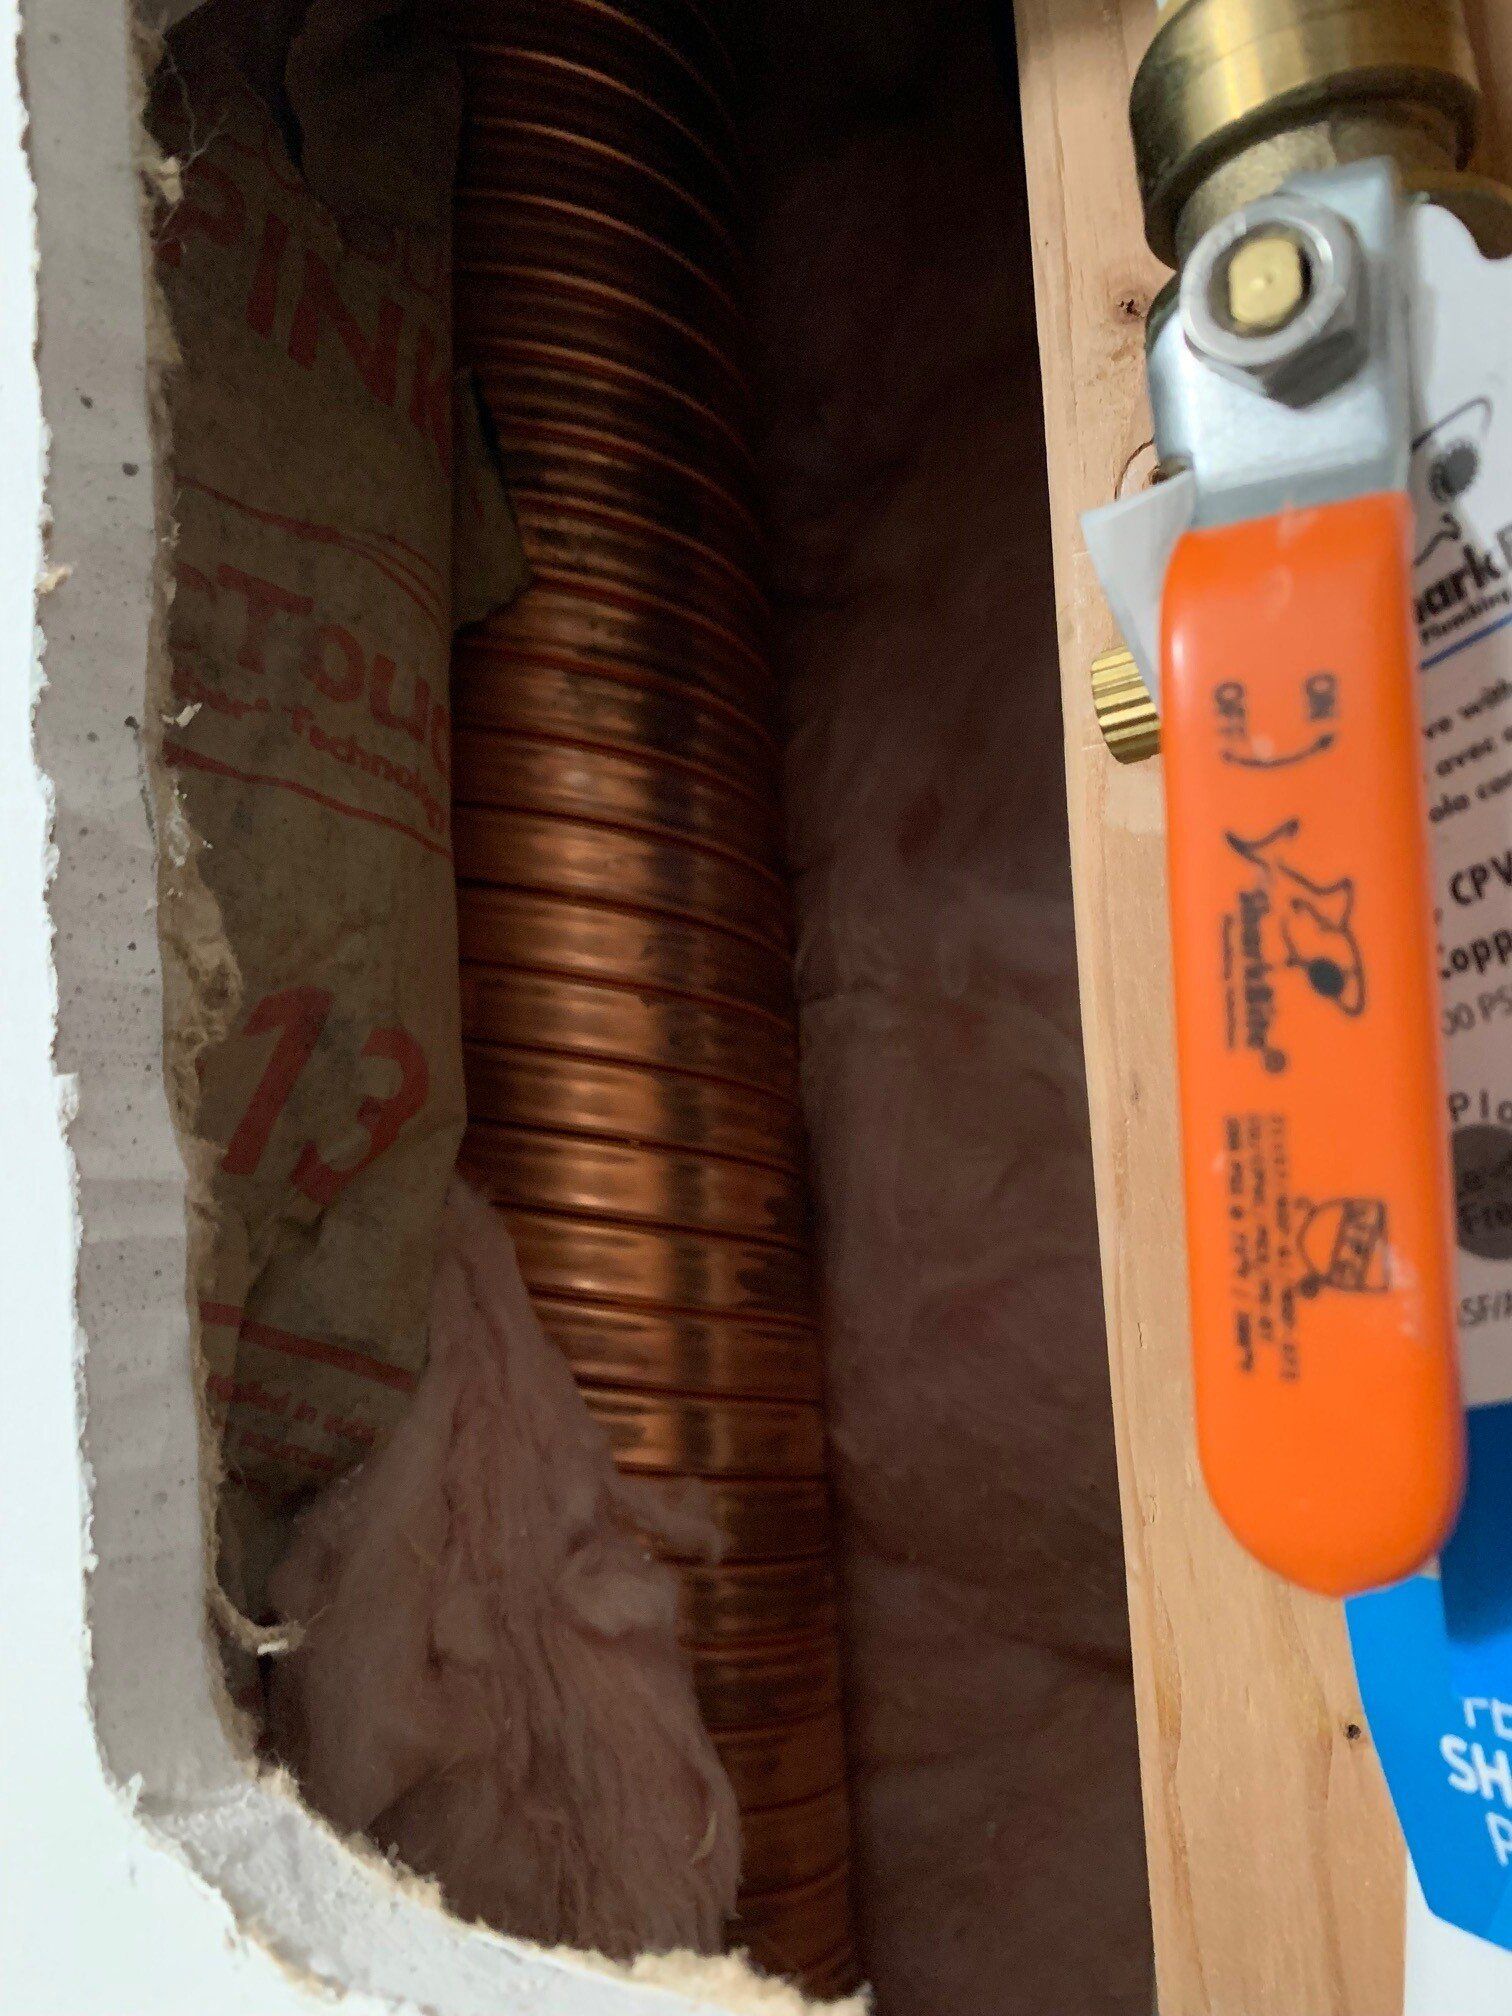
72" Drain Water Heat Recovery Unit installed in the will
Heat Pump Water Heater:
In our prior Kaysville home, the ground loop heat pump provided 80% of hot water heating needs and a resistive electric tank water heater did the rest, the water heater consumed about 1500 kWh per year in electricity.
In this house I chose to go with a fancy Rheem brand heat pump water heater. It is phenomenally energy efficient.
It consumes 619 kWh per year for all our hot water heating needs.
I attribute this enormous improvement in energy efficiency to:
- A better, taller DWHR unit
- More efficient water consumption in this house
- More direct routes for all hot water plumbing lines.

Rheem Heat Pump Water Heater
Roof:
The roof is a simple asphalt shingle hip roof with a relatively low pitch. I went with this design for the post-modern look, cost and for simplicity of installing it.
There is a soffit vent in every 3rd space between trusses.
The trusses have a 12” energy heel and are designed to withstand winds upwards of 120 mph.
A framer buddy of mine was going to bring his crew and a crane to help set trusses but my schedule slipped and he was unable to meet until a long time after that.
Without a contingency plan I decided to attempt the entire thing myself. It sounded like a fun challenge. The heaviest truss weighed around 212 lbs., it was almost too heavy to hoist it up onto the roof but I managed. Most were less than 195 lbs and the hip trusses were lighter.
I don't mind shingling but I hired that part of the roof out because I spent way too long putting up trusses and was running out of time. They shingled it all, (10,000 pounds of shingles), in a day. I also hired out the soffits, gutters, stucco and siding.
The siding guy Cesario also did all the cedar ceilings and cedar trim work.

Backyard View of our Home with Garden Terraces In Place
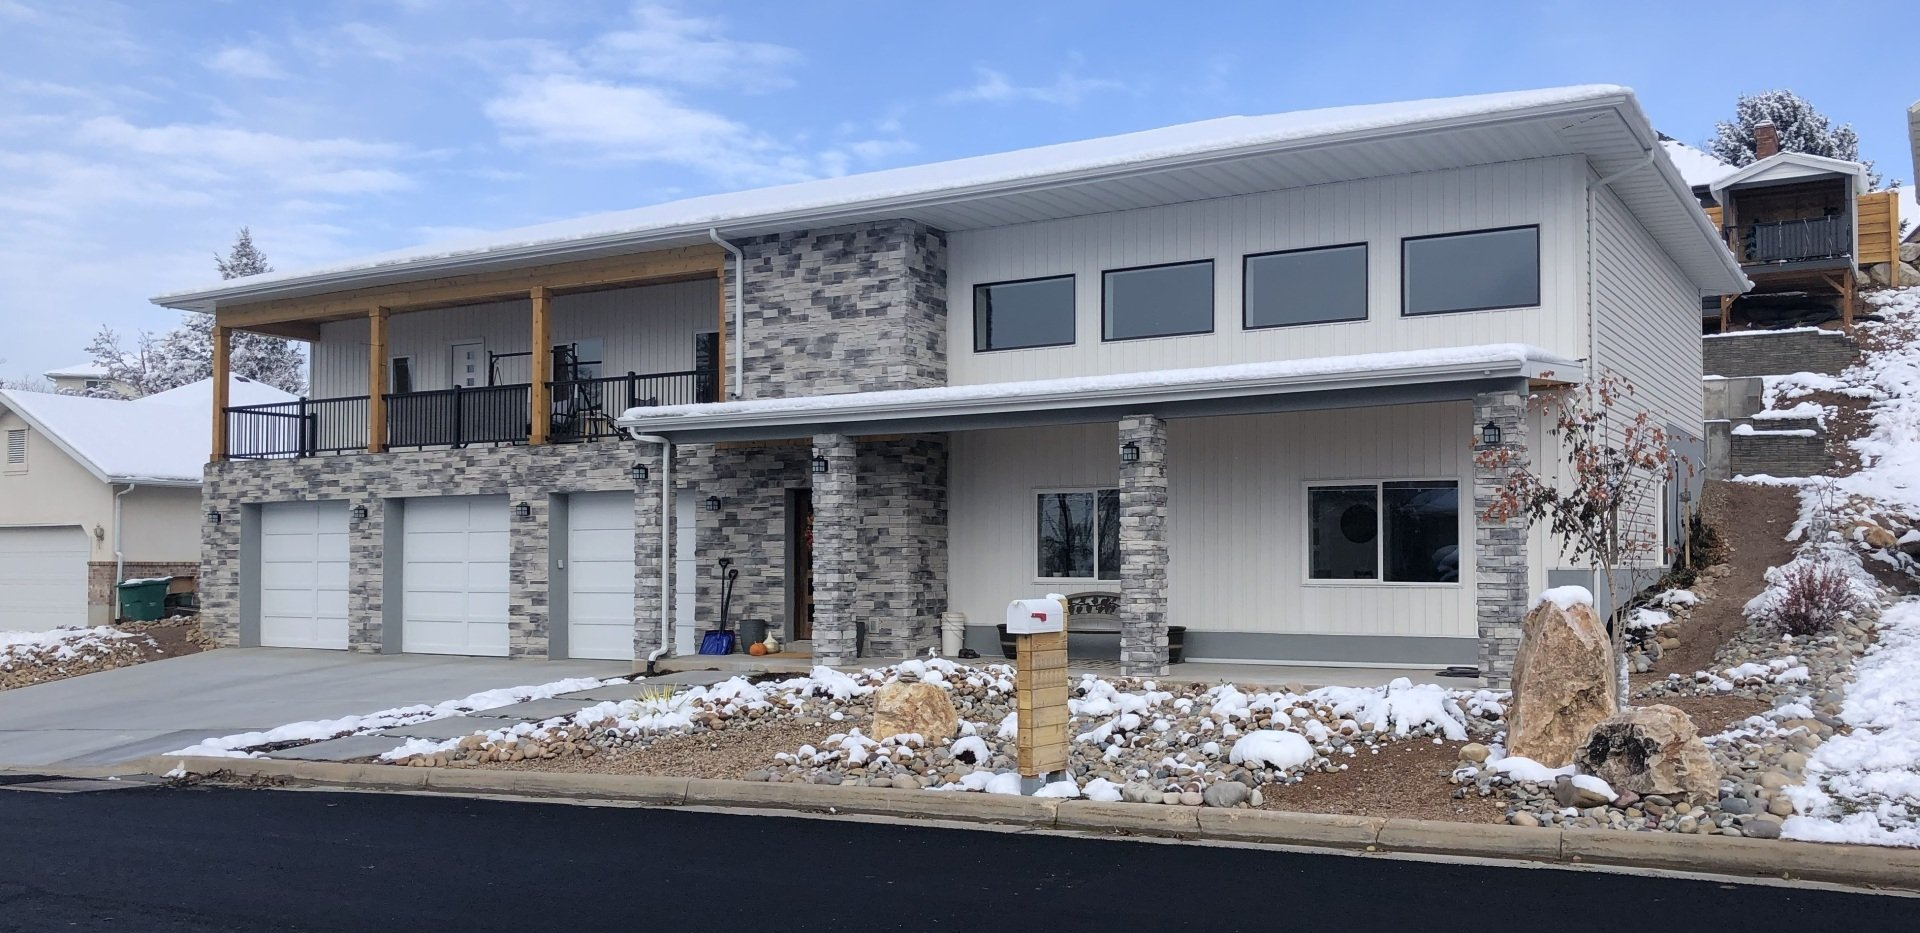
Finished Exterior with Front Yard Xeriscape
Calculating for Passive solar:
Take your latitude +- 23.5° that will give you the position of the sun in the sky at noon on the winter and summer solstices. For example in Northern Utah, the winter solstice noon day sun is at 17.5° in the sky and the summer solstice sun is at 64.5°. Take the tangent of the sun angle and window hight and you can calculate how long the soffit or awning needs to extend away from the exterior wall of the house. Boom!!!

Solstice Angles for Northern Utah
Passive Solar Heating:
All front windows and front awnings and roof soffits are designed and placed so that direct sunlight enters these windows during the winter months and yet they experience full shade during the summer months.
Due to some errors on my part
- Set the J-bolts for the porch awning header too low
- Forgot to account for header beam (above the deck above garage) in solstice sun angle calculations.
- Neglected to account for rain gutters in my roof eve length calculations for determining sun angles.
I ended up having to compromise a little bit on the amount of sunlight that actually made it into the bedroom and living room windows.
In the end every window receives full shade in the summer time.
The windows above the awning receive full sun on the winter solstice.
The windows above the garage and below the awning receive almost full sun.
The photo below shows the shadow line at mid-day during the winter solstice.

Sun/Shade line mid-day on the Winter Solstice
Even with this reduced passive solar heating, relatively low solar heat gain coefficient of double pane glass and the sun angle, on the winter solstice, the windows still manage to let in 5kW of solar energy into the home.
By comparison, during the summer solstice, the south-facing windows (in the front door) only let in 20 watts of heat.

Passive Solar Heat Power Calculations

Cozy inside even when it's freezing outside

Sun from the upper windows makes it all the way into the kitchen on the main level.
With high R-value insulation and the thermal mass of the concrete slab and the concrete inside the walls, the house maintains its temperature exceptionally well.
This allows the temperature of the home to remain constant for hours at a time, lending itself to do exceptionally well during peak electric rate periods.
Windows:
South-facing double pane windows have a Solar Heat Gain Coefficient 0.56 with an R-value of around 3.5
East, West and North facing windows have a Solar Heat Gain Coefficient of around 0.3 with an R-value of around 3.5
All Electric:
I quit natural gas in our last house back in 2014. I'm sure as hell not going to start back up again now. Even though the utility company's gas line runs through the front of the property next to the street, I choose to leave the past in the past and not dig it up again.
Time Of Use:
Some of the major appliances can be programmed when to operate:
- Electric cars
- HVAC
- Electric heat-pump water heater
- even the defrost cycle on our LG brand refrigerator can be programmed to not run during the peak period.
This enables the house to use 95% of its electricity during the off-peak periods without anyone at home noticing anything different.
Time of Use Option 2:
I decided to try out the experimental, time of use plan that the utility company offers. It’s called EV time of use Option 2.
During the hours of 3pm to 8pm the peak rate is 32.4 cents/kWh. All other times it’s only 3.2 cents/kWh. In the winter months an additional on-peak time between 8-10am is thrown in.
While 32.4 cents/kWh is a crazy high electric rate for a home in Northern Utah, 3.2 cents/kWh is super cheap. Because the vast majority of our electricity is consumed off-peak, my effective electric rate is only 5.1 cents/kWh in the summertime and 5.7 cents/kWh in the wintertime.
The house has an enormous ability to store heat. A 5+ hour heat battery if you will. This allows the heater (or air conditioning) to not have to run during the long peak periods of the day. Even during the coldest, cloudiest winter days the house still stays within room temperature range. And even during the hottest summer days the house is still comfortable, even after no AC for 5 hours. Or no heat for 5 hours.
In the winter time, if it is sunny outside, that will heat up the house all on its own and often times the house is still above the thermostat setpoint, even after the 5 hour peak period.
Grid Storage:
Going with the TOU2 electric rate cut our average electric bill in half (from $240/month to around $111/month).
Wanting our electricity to still come from 100% renewable sources we subscribe to the Blue Sky program with the power company. This adds $11.95 per month to our electric bill, totally worth it in my opinion for ethically sourced, guilt free, clean energy.

Electric Bill on the EV-TOU2 rate but prior to adding battery storage
That was a great improvement but 30% of this new bill comes from the 115 kWh per month of on-peak electric usage. That is only about 3-4 kWh per day, so not very much energy to have to store for later use.
Tesla Power walls are super cool but I couldn't justify the enormous up-front cost. The ROI is way to long. In JSE fashion, I made my own version of a Tesla Power wall. I call it the JohnSavesEnergy VeryPowerful Wall. At 1/8th the cost, it covers most of our on-peak energy usage using a few COTS (commercial off the shelf) plug-in inverters on smart switches and a 2.4 kWh (later upgraded to 4.8 kWh shown below) battery pack made from some lithium packs used in electric scooters. The inverters run on-peak and the battery pack charges up during the off-peak periods.
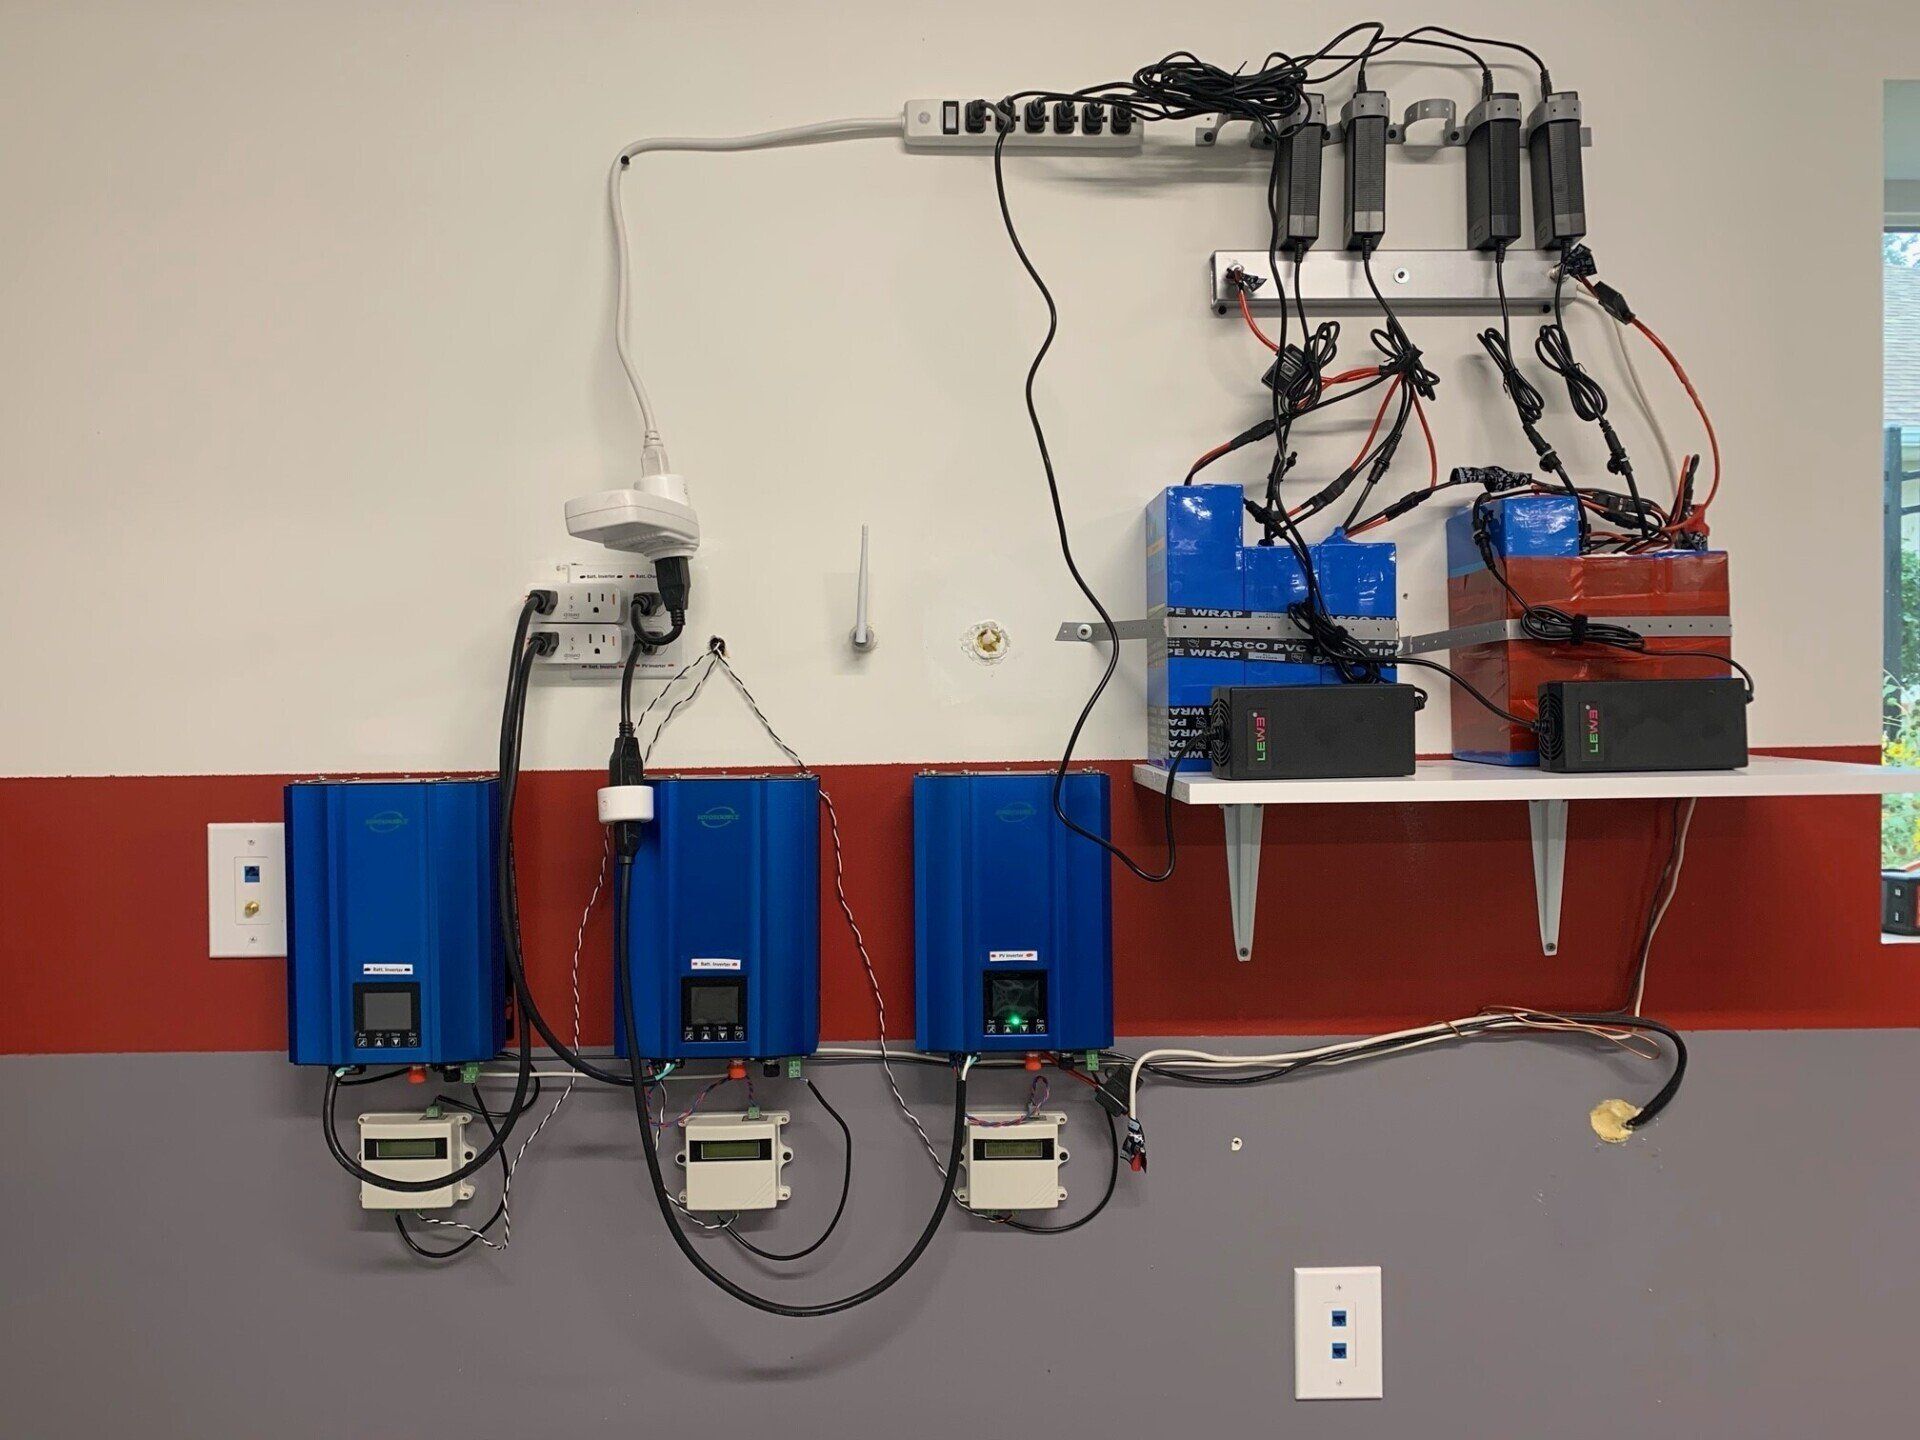
The JohnSavesEnergy VeryPowerful Wall (up to 2700 watts AC output and 4.8 kWh of battery energy storage)
After installing the JohnSavesEnergy VeryPowerful Wall, even though we consume around 1550 kWh/month, our electric bill (prior to buying Blue Sky Renewable Energy Credits) is around $68/month. That's an effective electric rate of 3.5 cents/kWh.
Factoring in the extra $11.95/month toward Blue Sky brings our electric rate to 5.4 cents/kWh.
Not bad for an all-electric house, including heating/AC and three electric cars, all powered effectively by 100% renewable energy.

Electric Bill on EV-TOU2 rate and after installing The JohnSavesEnergy VeryPowerful Wall
Some days, 2.4 kWh is not enough energy to cover all home energy consumption during the peak periods, thus the non-zero energy charge during the on-peak periods.
For the past 10 months, not running laundry, dish washer and minimizing cooking during the on-peak periods has been a slight annoyance for my family. For the sake of saving energy and money without sacrificing convenience and luxury, just this month, (Oct 2021) I added an additional 2.4kWh battery pack, and ordered an additional inverter, bringing the power output to 3600 watts and total energy storage to 4.8 kWh. This will allow more energy use freedom during the on-peak periods while further reducing peak energy billing to near zero.